Posts : 233 Join date : 2008-07-01 Age : 76 Location : Evans, GA, USA
Subject: A Boring Video March 6th 2009, 4:42 am
This thread was originally posted on SMC.
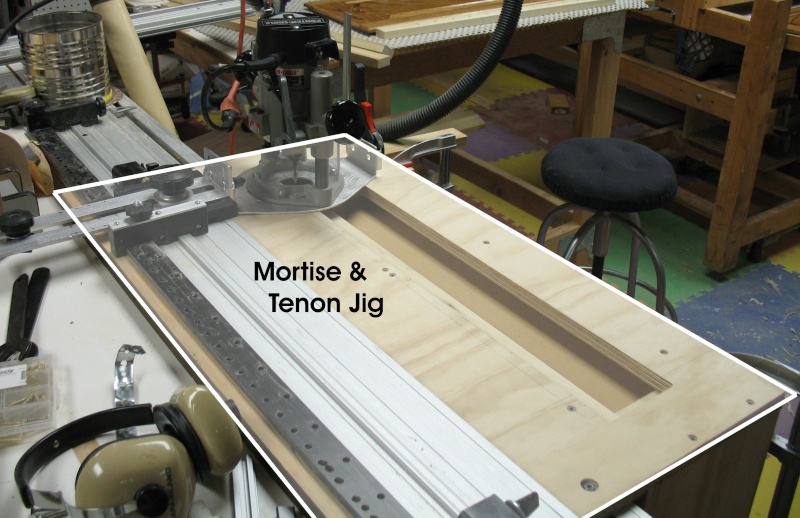
I needed shelf standards for an existing cabinet, but wanted wooden rather than metal. I decided to make four standards with evenly spaced holes, using the In-line Drilling jig I used to drill the holes for the Christmas Star I made for a friend. The standards only needed to be 27" long, so I decided to use the Mortise & Tenon jig that I am currently developing to hold the work pieces.
The M&T jig allows me to clamp work pieces vertically or horizontally for routing with the EZ Smart Router Kit (SRK). The work piece can be registered for repeatability. It can handle work pieces up to 32" long. I will be doing a post on the M&T jig once I have finished developing it or at least gotten it to a point where it will be readily usable without having to make or modify something. Briefly, the work piece is clamped between the top of the jig and a height adjustable table. At this time I am using pieces of scrap and clamps to hold the work Piece tight against the body of the jig. I will probably be using cam clamps to hold the work piece in place once I work out how I want to attach them so that their location will be adjustable.
The In-line Indexer fastens to the rail of the M&T jig, and is locked in place once I set the SRK to align with the first hole marked on the work piece. To do this, I use a setup bit in the router and align the point with the the center of the first hole location. Making sure that the index pin is in a hole, I tighten the clamps on the indexer. I replace the setup bit with a 1/4" spiral (up cut) bit and start drilling.
This short video shows how EZ it is to drill the holes for a standard. Note the hesitations in raising the index pin when I start trying to move the router before raising the pin. I need to get the process down a little better.
Ken Whitney Posted:
Dik,
Very handy jig. Is the jig attached to a power bench or is it a stand-alone unit?
Ken
Jeff Freelove Posted:
Very Nice!
Dik,
That is a very useful jig. I would definitely pay for an EZ-Smart Shelf pin jig.
Thanks for the video!
Jeff
Dik Harrison Replied:
Thank you both. It is quite handy, and makes quick work of drill a series of holes. You could actually have index bars set up with a lot of different hole configurations. Each bar can have two different hole patterns. The one I'm using is one that I did a lot of prototyping with, so the holes on the "unused" side are quite a jumble.
Ken Whitney: Is the jig attached to a power bench or is it a stand-alone unit?
Ken, it is on the side of my custom PBB which is currently in a 5' x 6' configuration. It fastens to the SMEs on the top edge and the side. I'll try to take some more pictures to post today.
Colin Wollerman Posted:
Brilliant
That is so cool Dik!
I like where this is going. I can't wait to see your M&T jig in action.
I am really interested in a PBB mod. with woodrat capabilities.
Looks like you are well on your way. Very exciting.
Thanks for posting. C
Burt Waddel Posted:
Dik,
Very nice jig - I like it!
Is there a reason for using the router instead of a drill?
Burt
Dik Harrison Replied:
Thanks guys.
Burt, when I drilled those 206 1" holes for that Christmas star, I tried a drill with one of those devices that makes a "drill press" out of your hand drill. Well you can not drill 1" holes with a Forstner bit (the holes needed to be clean and perpendicular to the face of the work piece) very fast at all. It takes a lot of elbow grease and the device leaves a lot to be desired when it comes to keeping the hole perpendicular. The router on the other hand, drills the holes quickly, easily and perpendicularly. I realize that there is a limit to the available sized of router bits, but for those sizes that are available, I'll use the router every time when a lot of holes need to be drilled in a straight line or when they need to be further from the edge than I can accomplish with a drill press. I'll still use the drill press a lot (I have three), but they are limited as to how far I can drill a hole from the edge. The SRK and a rail are virtually unlimited.
Burt Waddel Replied:
Dik,
You made a lot of good points. I have tried an EZ Setup with a drill rigged like you said and was happy with the results but I can see the advantage to the router with the larger holes.
Burt
Larry Strawson Posted:
Very interesting, thank you for your contributions Dik. Your videos and insight are very informative.