This thread was originally posted on SMC. It was my first thread. The PBB has long since been built, but I am posting this here to show those of you planning a custom PBB the thought processes I went through and the help I received. Maybe it, along with ideas posted by Burt and others, will help you get your design together. I also have several posts on my blog that deal with my custom PBB and the process I went through designing and building it. The first is about the fence.I would appreciate some feedback on my PBB design. But first, let thank all of you for your discussions and pictures of your designed and existing PBBs. I have incorporated many of your great ideas into this design.
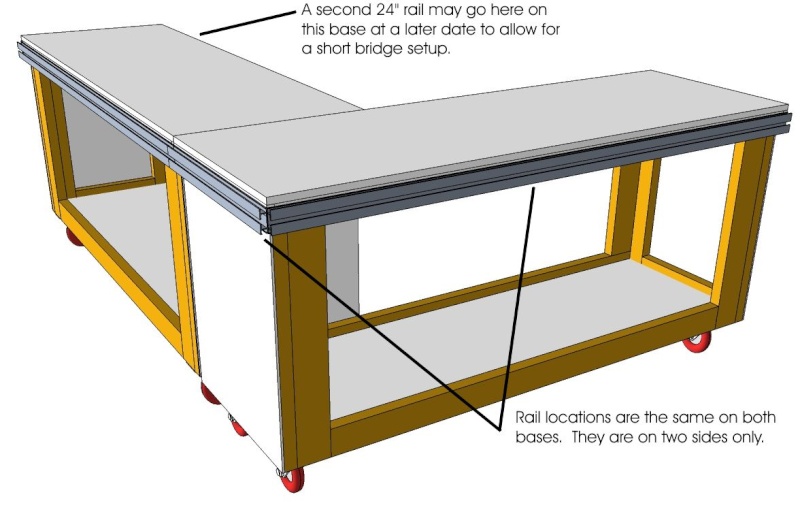
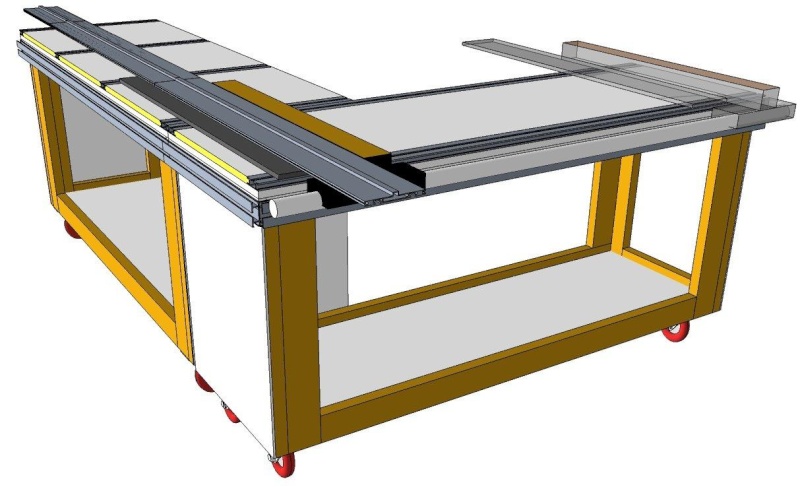
It is large because I have the room and I foresee it being used for most of my straight line cutting and routing needs. There are two base units that will normally be attached to create an L shaped PBB. They can also be connected to create a square PBB if the need should arise, and could be used individually with the addition of a second side rail for the bridge.
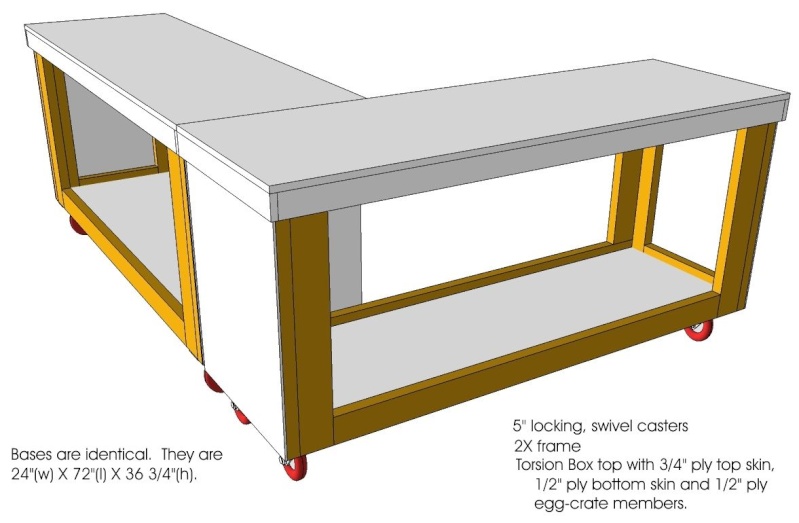
The side rails will be attached to one long side and to the counterclockwise short side. One base could have a 24 rail attached to the long side adjoining the short side with the rail to allow that end to have a short bridge attached so it could be used like a miter saw. I plan on using my Incra miter gauge with a connector attached in one of the SMEs that will be mounted on the top.
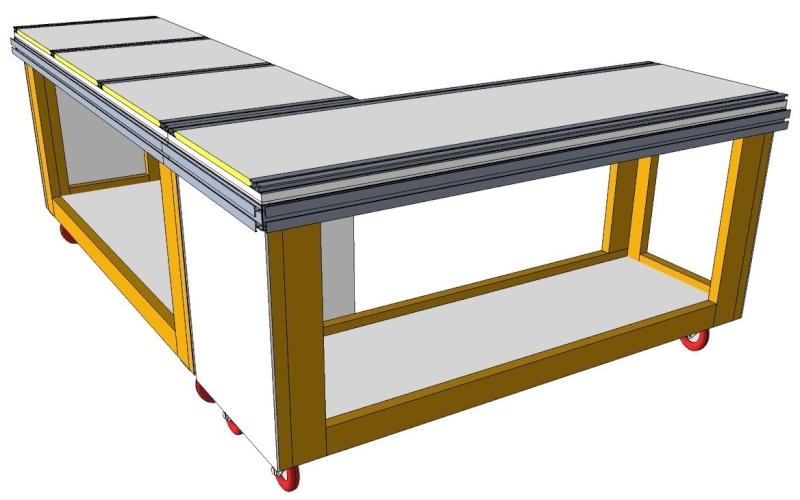
The SMEs will allow for the use of stops, additional fences, the miter gauge, to secure the free end of the fence that will also be attached and to provide sliding surfaces to assist in supporting large sheet goods.
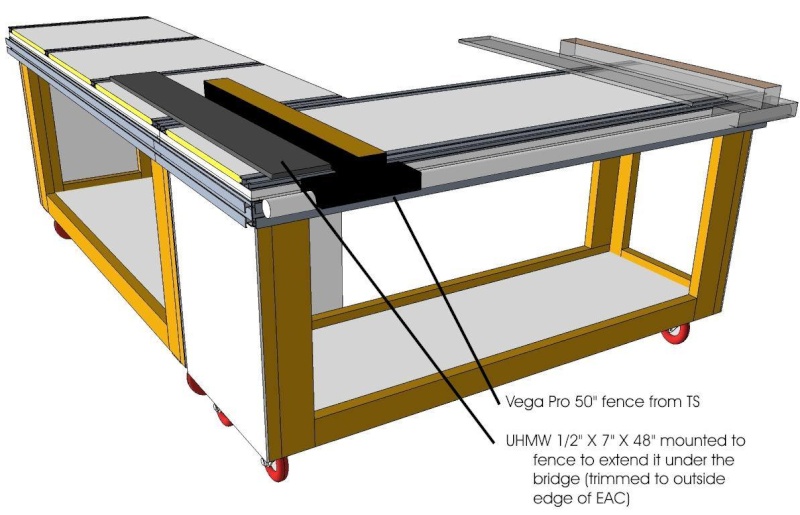
The fence I will be attaching is a VEGA Pro 50 that will come from my TS, as I will no longer be using the TS to cut sheet goods. I will attach a ½ X 7 X 48 piece of UHMW horizontally to the bottom of the fence to act as a fence extension under the bridge. This will for cutting strips narrower than the bridge and still being able to use the fences scale. This is possible because, with the fence set to zero and the UHMW will be trimmed to the EAC. I plan on using the far SME with a piece of connector, bolt and knob attached to the bottom of the fence, to secure the free end of the fence if necessary, although I have never found it necessary on the TS.
With the mounting of the bridge, I hope to have the beginnings of the most useful tool in my shop. Storage and other details will evolve after I begin to use the PBB.
Please, before I start ordering (and I need to get it order before the sale ends) and building, what have I forgotten, gotten wrong, not thought of, made awkward to use, etc.
Thank you in advance for any comments you wish to offer.
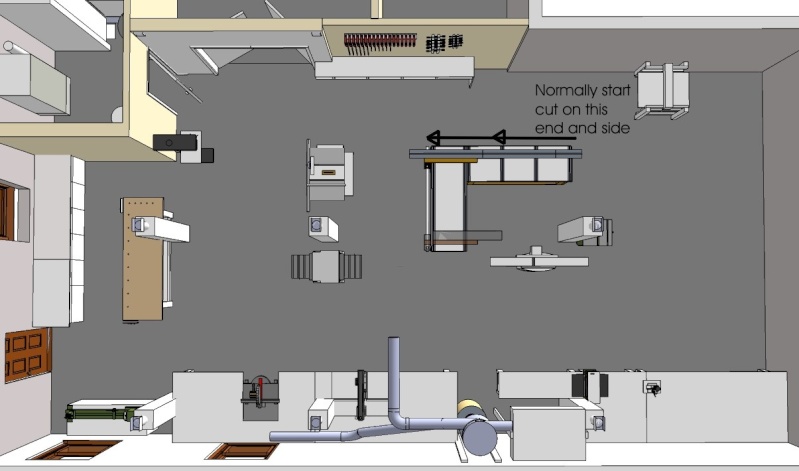
Jeff Caskie Replied: My initial question would be how do you intend on situating this within the room..? Presumably, you will be standing and starting your cut where the fence is situated and walking up the left side. If this is the case, depending on where you place this along the wall.... would the upper right corner be all wasted space?
great job on the detailed drawings...
Mark Hartwig Replied:great job on the detailed drawings...
And what software did you use to produce them?
Dik Harrison Replied:ClarificationThanks Jeff,
The attached is a preliminary redesign of my workshop. I have inherited some additional equipment and have find a useful place for it. I also have become aware (after 12 years and retirement) that my original layout was not very functional, and need to move things around a bit. Also the discovery of the EZ system has changed my thinking on much of what I do in the shop. Sooooooo, it is time for a little furniture moving...
As you can see, I have a relatively large if not uncluttered area. There are columns everywhere that I have to deal with. I also intend to use the PBB as a out-feed for the TS (if I continue to use it). I have a central dust collection system, so moving things too much is more difficult than it should be.
The wasted space will probably wind up with something in it that is lower that the PBB. Possibly a downdraft sanding table I'm designing. I want the space open at PBB height for situating full 4X8 sheets along either major axis. I can then either rip or crosscut first with the same setup. I have a sheet goods cart that allows me to move full sheets about nearly vertical and then tilts down so they can be slid on to the PBB. Thus reducing the lifting of sheets that get heavier every year.
Mark,
I use Google SketchUp Pro for almost all my design work, I have used a number of different CAD programs over the years and have always liked Generic CADD (now defunct) and its offspring because of the 2-3 letter commands. SketchUp is great. It has single letter commands (wish it had 2-3 letter commands) and the most intuitive 3D functionality I have ever seen. You can be as sketchy or exact as need be for the task at hand.
I exported the view I wanted into a jpg file and then used Corel Photo-Paint to crop, add the text and lines, and to save in the proper file size for uploading.
Jeff Caskie Replied:Looks great... how much time did it take you to sketch all that?
Do you intend on setting your measurements on the side with the fence... then waking to the back to cut back towards the fence? It would ensure that you do not cut through the fence rail.. but could
involve a lot of additional back and forth. One suggestion I would have is to look at Burt's slideshow on how he incorporated a unifence. It is in an older thread that should come up by searching this forum on 'unifence'. In order to avoid cutting into the fence rail, he offset it from the side rail by a certain amount (enough to fit your saw). This way you could measure and cut from the same side. Just a thought.. in case you didn't come across that thread.
I do like the two rolling tables that can be joined in various combinations. There is another thread a month or two old where somebody else did a similar design. You might want to revive it and find out how it is working out for him.
Dik Harrison Replied:Thanks for the feedback.Jeff,
I really cannot guess how much time was spent, I have most of my house drawn up in SketchUp because I have so many projects done and in the works. I am a visual person so I have to draw what I am going to do or what I want done. That way I can make better decisions. I started drawing my workshop layout some years ago before I had SketchUp and transfered some of that to SketchUp. Since I started planning on building a PBB, I have fleshed out the layout and will continue working on it as projects allow/require. Eventually I'll start redoing the shop.
I am familiar with both those post (as well as every post on PBBs I could find), and have incorporated many of their ideas. After using my Smart Table for a little while, I find that I prefer cutting left to right, using my right hand saw and my left hand. I want the "dead wood principle" to be used as much as possible, with the "keeper" piece under the bridge. My fence cannot readily be mounted on the other end to make setting then cutting easier, so this is the compromise. I plan on re-thinking this before I begin building, it is the best I can do for now.
You posts have helped me to re-think some of my ideas, and I will surly keep your and others suggestions in mind as I approach building my PBB. Thank you again...
Brian Willan Replied:After using my Smart Table for a little while, I find that I prefer cutting left to right, using my right hand saw and my left hand. I want the "dead wood principle" to be used as much as possible, with the "keeper" piece under the bridge. Hi Dik
As an observation from your above statement, there are going to be times when ripping full sheets of stock that having the keeper piece under the bridge won't be practical due to the need of additional supports. As an example ripping multiple 6" strips 8 feet long. Since your benches are only 24" wide or deep depending on orientation, it might be worth considering arranging your tables in a 'T' configuration to give better support to full size sheets.
The design for the power bench I had in my head had it sized 36"x97" (full length of mdf or melamine) I would have the cut line placed down the center of the 36" side (18" from the long edge). I also plan on installing T-track across the width of my top in a few locations (set parallel to the end of the top) for fences, stops and other attachments. T-track and jig and fixture parts are locally available. I am in Canada so there is also some shipping consideration there too. The base would then be configured for storage of tools and accessories.
Your design will evolve over time based upon how you use it and the material that you will be working with. So getting it perfect from the beginning would be rather difficult.
Have fun and keep us posted on your progress during its construction.
Cheers
Brian
Burt Wadell Replied:Dik,
The design looks good. That basic "L" design will lend itsself to all kinds of fun and games.
I'd prefer to set it up to cut from the inside of the "L" but that is personal preference.
I don't think that cutting over the rail for the saw fence is a major concern. I have two of the unifence setups. One I am cutting over and the other I am not. The way you are setting up your fence, You will probably end up cutting by the end of the rail. I used unifences so they are aluminum. I just got a biesemeyer and it is all steel.
One of the unifences is set up for cut-off work and is about 24". The other is used for ripping on a 8' plus bench and is inset from the end of the bench so that it is located closer to the center of a 8' board.
Burt
Dik Harrison Replied:Caught me in a senior moment.Brian,
Thank you, I had completely forgotten about those over-sized particle board and MDF sheets. I have been considering putting a hardwood band around the torsion box for aesthetic purposes. If I keep the torsion box at 24, this added ¾ all around will give me enough length for these monsters.
I also had not considered cutting narrow strips from full sheets. I assumed that with sliding modules to extend the table top to the cut-off side of the bridge, I should be able to rip narrow strips without much problem. I have thought about this, and my solution is additional support in the form of a sheet goods cart I built.
The cart allows me to transport those bulky, heavy full sheets about the shop nearly vertically, and then can be tilted and locked in a horizontal position at my standard work surface height. I can slide the sheet from the pickup bed to the cart in horizontal mode, tilt the sheet vertical, and transport to and slide into my vertical storage rack. When I need a sheet, I slide it onto the cart vertically, move it to the work area, tilt and lock it horizontal, and slide the sheet into position. I never have to lift whole sheets (something that gets more difficult every year).
Cutting those narrow strips can be accomplished from the back side of the table. Since the table is only @24 wide, I can easily cut while standing behind the bridge. With a 36 table, this would be too much of a stretch for me. I may have to start the cut like normal and then shift to behind the table. A picture is worth

As you can see, I have already incorporated suggestions made earlier. If I move/replace the scale on the fence guide, I can re-orient it so as to save some steps in normal usage.
Burt,
Thank you. Actually, your off-set Unifence PBB was the primary basis for my design. I have considered off-setting my fence, but will wait until I have used it as designed for a while. If I have problems keeping the sheets aligned with the fence, Ill do a little redesign work to off-set the fence.
I think I am going to have to use a raiser block between the fence and the slider to give me clearance between the steel rail and the blade. I just hope this will not compromise the stiffness of the fence. Im planning to lock down the free end of the fence, so hopefully there wont be a problem.
Thank you all...
Thank you all for your suggestions! I have done some re-designing and my material needs have not changed significantly, so I have placed my order with George and talked with Dino (both really great guys), and now just have to await arrival and the time to start building. I will try to keep you posted with pics as I progress. Thanks again, you all have been helpful.


