The following is from a thread originally posted on SMC. It has been retitled to make the title fit the subject.Another thread,
http://www.sawmillcreek.org/showthread.php?t=61212, got me to thinking about the panel planer/surfacer I built last year. It works well (saved me when a panel I glued up came out bowed), but I began wondering if I couldn't replicate it EZíly. The original came from magazine plans that I canít place my hands on right now, but it looks like this.
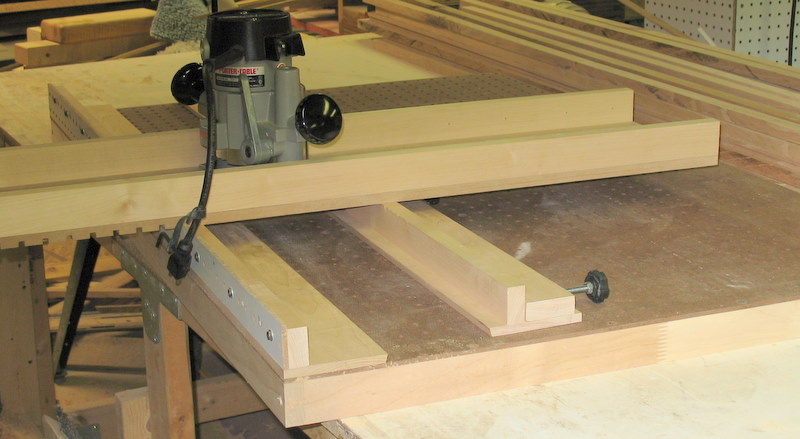
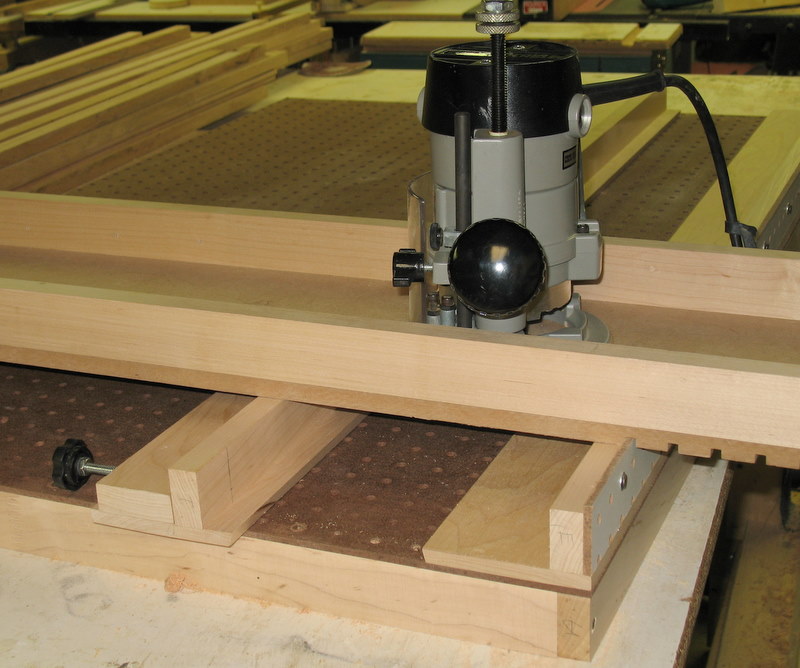
The wood is held in place with two thin parallel boards that have a 45 degree ripped along the edge. The router is attached to a sled which has dado's underneath on one side of the router. The sled is supported by parallel strips, one of which has hard board projecting above the edge so it can ride in the dado's. The dado's increment the travel across the wood by slightly less than the diameter (1.5Ē) of the bottom cleaning bit that is used for surfacing.
Since my PBB order is not here yet, I decided to do a little designing. This is my concept for an EZ version.
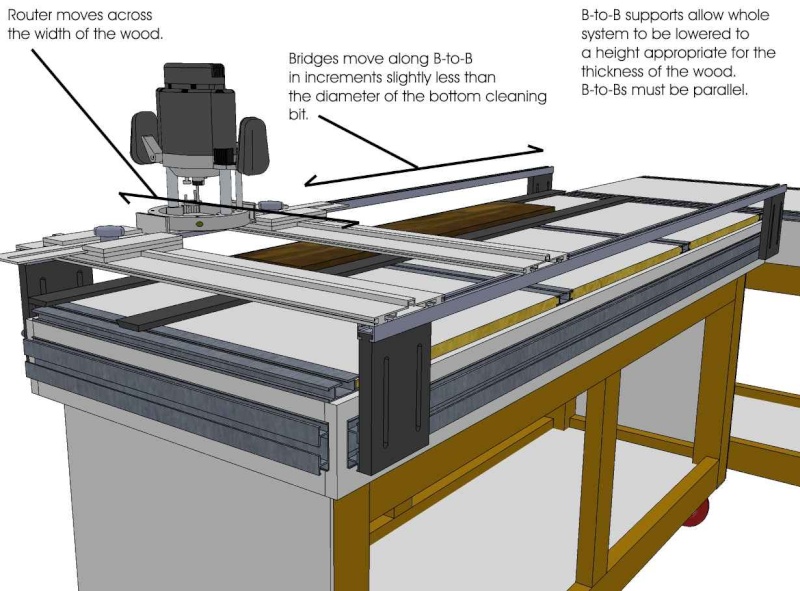
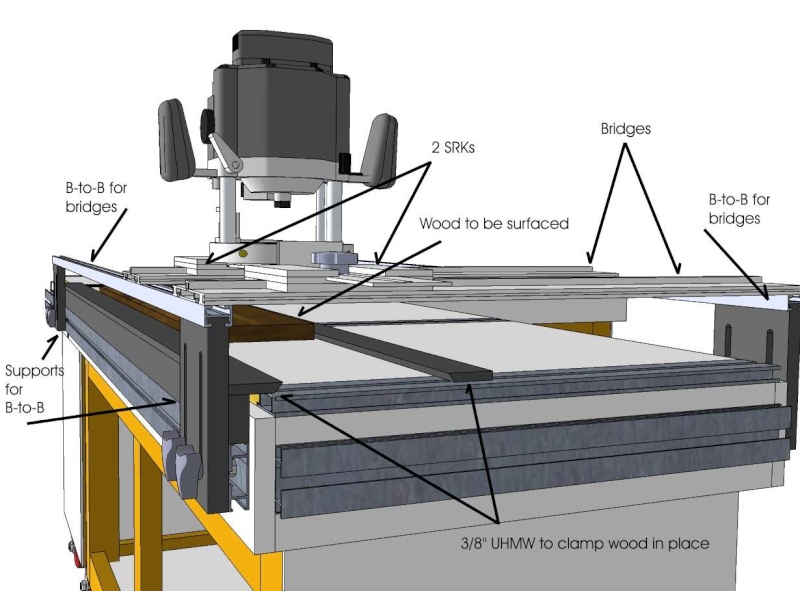 Note that since this was originally posted, Dino has come up with the dual SRK. If this ever gets built, it will use one.
Are the B-to-B rails stiff enough to support the bridges, SRKs and router when suspended from the ends (they are 72Ē long)?
Does anyone have any suggestions on how I can increment the bridges along the B-to-B rails (like the dado's in the original)?
As always, any questions, ideas, thoughts, criticisms or suggestions are welcome.
Patrick Anderson Replied:Interesting idea and some nice SU work there mate. As soon as I can find a buyer for my TS I'm going with a PBB
Bruce Benjamin Replied:Dik, I'm not trying to discourage you but that looks like a pretty complicated setup with a lot of expensive extrusions, two bridges and two SRK's. Granted, with the PBB setup and one SRK, as many of us already have or will have, you're already half way there. But add the extra set of bridge supports and the extra extrusion and the $$ can really add up. Cheaper than a portable lunchbox planer but not a lot cheaper. More capacity though.
Another problem I see is making sure you get the rails and rail supports that are held up by the Bridges all exactly the same height. That's four different adjustments to get right. Maybe if you use a premade spacer between the table top and the rail supports it would be easier to get them all perfect.
Also, surfacing even a small board with a router bit is a pretty slow process and it won't always leave a perfectly smooth surface that I can get with my jointer and my planer in a fraction of the time. Even if I had to build a sled and only use my Dewalt 735 planer, (If I didn't have an 8" jointer) it would still be much faster and cleaner and easier.
Router bits don't last for ever and aren't cheap and I'd bet you'd go through one pretty quickly just surfacing the lumber for one chest of drawers or even a coffee table. Also, the dust collection on both my jointer and my planer are excellent. Only a few routers have decent dust collection capabilities and you'd be throwing up a whole lot of very fine dust with that set up instead of a lot of larger chips and only a little dust with mine.
I guess, other than saving the footprint space of a lunchbox planer I don't see how this would fall into the EZ way of thinking. It's not faster or easier or better and since I don't see any real danger with a planer I don't see a safety advantage either. If you already have a PBB Kit and an SRK then it might be a little cheaper but I'd have to do the math on that one.
Sorry, this is just my feedback that you asked for. I'm not trying to be a kill joy or a jerk. I think you can make this work but it just doesn't seem like a very efficient use of time or $$ to me. But I admire your creativity and imagination as well as your ability to draw up incredibly useful and clear images of your ideas. Keep it up!

Bruce
Dik Harrison Replied:Thanks for the feedback.
Bruce,
You needn't apologize for your responses, they are insightful, truthful, honest, and welcome. In my career, I always seemed to wind up playing the devil's advocate, so I am quite used to the give and take flow of ideas. As usual I see that I have failed to convey all that I should have in my original post.
I actually have two planers, a Dewalt 12" and an old Belsaw 12" molder/planer. Unfortunately, neither lets me plane an 18" or 24" panel, both of which I have done recently. I just used the original setup to flatten a very warped but nicely figured board that would have otherwise been burned this winter. I have a number of oak and poplar boards that I cannot plane in my planer, and do not wish to rip them, plane them, and then glue them back together.
Currently I only have a very old Craftsman 6" joiner, and although I have worked with wood and woodworking my whole life, I would not feel comfortable trying to surface join a board on a 12" or greater joiner (plus the expense is more than I can justify).
I am satisfied with my original setup, but it can be a chore to get setup (I have to clear off my out-feed/assembly/sanding/staining/finishing table), and does take up some wall space when stored. I see this design exercise as a possible replacement, and yet another way to make a task EZ.
I doubt I would purchase a second SRK, but would probably make replacement router base for the SRK that I have on order. This base would allow me to add a support to the other side of the router, thus reducing the likelihood of letting the router "dig in", since there will not be a flat surface for the base to ride upon.
I agree about the dust issue, it does produce a lot, and given that the router is not riding on the surface, the router DC catches little of the copious amount that is produced. I am still considering making the top of my PBB a large DC with holes and a catchment area below.
Thank you again for your response, and I hope to see more in the future...
Michael Schwartz Replied:Dik,
While I agree with Bruce that it is not practical for day to day surfacing tasks, I do think it would be practical for flattening outlarge one of a kind slabs, or flattening out things that are too short for the planer or jointer, or odd shaped stuff.
I am working on some ideas for setup myself.
For the price of the conponents needed to make it you could buy a decent portable planer, and make a sled for it.
This setup could be made more economical by using more shop made parts out of Plywood, UMHW, and MDF.
I think it is a great design, and it has its uses. It is defiantly a brilliant adaptation of an already versatile jig.
Burt Wadell Replied:Dik,
Your designs are great and so easy to understand.
I think that I understand what you are up to with your approach and find it to be practical for the use you intend. The only traditional way to handle large boards like you want to process is to use a huge jointer and a huge planer. Even these may destroy a highly figured board.
The method you have chosen is one of a very few that can accomplish your goal and of those methods, it is by far the most economical.
Burt
Dik Harrison Replied:Thanks...Mike and Burt, thank you both for your kind words. It is great to have fellow woodworkers to chat with, I don't know any in my area since I have never been in the industry here. I don't know if I will carry this project further, but at least I've given it some thought and have some good feedback ready for when I have the time/inclination to build it.
Joseph N. Myers Replied:Dik,
The above was discussed briefly on "Would I need a table saw...", and towards the end, I wrote:
------------------------------------------------------------------
Quote:
Originally Posted by
Joe Mioux  .... Someone said that ez can't do face jointing. Dino I have question. Could your bridge system be adapted some how to run a router in order to allow face jointing of a board? David Marks on Woodworks once showed a face jointing technique using a router rails and a router...... Joe -------------------------------------------------------------------
 Joe,
Welcome to the EZ forum.
Yes, the EZ System can be used for face joining and actually, there have been a couple of Posts on the subject by Dino and others. But they have been more geared for surfacing wider and/or "slab" type pieces of wood. I think it would be too time consuming to do a lot of face joining with the system especially with the cost of planers being so low.
Your right on with using the Bridge for this face joining (and I'm pretty sure Dino produced some pictures of the procedure). But now with all the new stuff, i.e., B2B (back-to-back), SME (sliding module-extrusion), etc., things would probably be faster, better and of course, safer. In any case I hope so as I dropped off a somewhat large walnut slab at Dino's last month so he could "practice" on it.
Regards, Joe
--------------------------------------------------------------------
I agree with everything that has been said in the thread so far. And have been thinking about Dino's new setup (I saw it briefly last month when I visited him). It basically consisted of 2 SRK's, Router, 2 Guide Rails and 2 Bridges. The 2 SRK's router bases (round metal plates) are placed under the Router and the SRK bases (the square plastic things) fit on the Guide Rails which are part of the Bridges.
You could (and I guess you did) just use the setup that you showed in your 1st 2 pictures. If you don't have the SRK's, I guess a long piece of plywood can be substituted. If you don't have the Guide Rails, the wooden rails you have would work. However, with the EZ parts, things go easier.
Hope this doesn't confuse the issue too much!!!
Regards, Joe
Brian Willan Replied:Hi Dik
That is a really slick idea you have for making a large EZ-router sled for use as a big thickness planer.
If you are looking for a system to even out the joints on a large panel glue up, have you considered a drum sander such as the ones available here?
http://www.stockroomsupply.com/V_Drum_Sander.phpThey make them up to 30 inches wide.
Cheers
Brian
Dale Sudhoff Replied:Since you would end up using it as firewood this winter; what have you got to lose. I've seen this same set-up in one of the magazines I've subscribe to years ago. Go for it.
Moules Marraniere Replied:
Ripping yarn ...
The traditional way of dealing with large width boards is to rip them to a width that will go through the planer and then edge joint afterwards. If done properly the grain will match almost imperceptibly.
But if one rips a very wide board into, say three pieces the growth rings, as seen from the board end, may be arranged alternate face-up and face-down. This is a further advantage as it is the usual way of minimising cupping, over time, as the growth rings shrink.
All this is a lot cheaper and a deal less hassle than the rather over engineered solution above. Although it has been quite well presented.
And some of you might remember the jack plane? When I learnt my skills I was only allowed to use sawn timber with no access to a machine planer. Happy Days.
Angela
Dik Harrison Replied:What, me confused? Thanks Joe, I think your response on the previous thread is what really got me thinking about this.
Brian, I have a shop built 24" drum sander that my Dad built years ago. I works okay, but takes a while to flatted a warped board. Thanks for the link, I had looked at those before I inherited my Dad's sander, but had forgotten about them. Never hurts to have references to things you might need in the future.
Thanks Angela, I'm aware of the technique, but it isn't my favorite. I'm getting too old to us a jack plane to flatten a board any more, but still use scrapers to remove planer marks and fuzzing at irregular grain.
My first woodworking job was in a shop that was run by a steam engine. We had a door sander that I believe went up to about 36". It was ancient back in the mid 60's, but did the job with two oscillating drums, one for a courser grit and the for a finer finishing grit.
Kevin L. Pauba Replied:Dik, those look like some nice sketchup components! Are you willing to share the models for the ez-smart components? I've been wanting to model a PBB setup myself and these would simplify the effort. Thanks.
Dik Harrison Replied:Thank you all...Once again input from the forum has been invaluable. I'll check with Dino about the stiffness of the B-to-B extrusion. I came up with a solution to the incrementing problem. I'll use a flip lever (in red) and a saw-toothed piece of UHMW for indexing. See the attached.
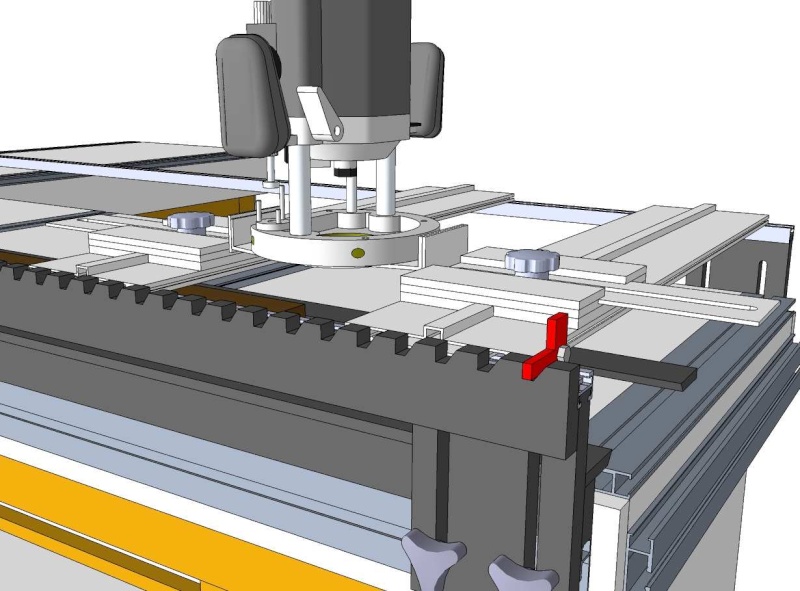
I will gladly send what I have to anyone that sends me their e-mail address. currently only the rail is from measurements (rough). The others are extracted from that with guesses made as to unknown dimensions. Once I receive my current order and have the time, I will create measured drawings and post them in a ZIP if that is possible.
