This thread was originally posted on SMC by Mike Goetzke. It is here with his permission.Last weekend I had a little problem getting the rip fence parallel to the rail while ripping 2" to 3" wide strips of red oak. Later I thought I should have used the SRK like Dino does to set the fence but that takes time, you have to remove/store it, and the travel is limited.
I had about an hour to play around in the shop tonight so I thought of a way to square the rip fence w/o any loose parts. I found a piece of 3/4" UHMW that I got from Eurekazone. First I squared it on the PBB and then I carefully milled it on the router table to fit inside the SME extrusion. I then slid this into the SME - it was a nice tight fit. It's consistently about 1/16" off from front to rear. I need to tweak it and when I get it dialed in I might pin or bolt it in place.
This won't work on everyones PBB because I have a solid/continuous stop fence to ride the square on.
I had a quick-clamp ready to hold the rip fence square against the squaring fence but the UHMW material glides so easily I didn't find the clamp necessary.


Mike
Peter Quadarella Posted:That's a great idea Mike. The rip fence is always cumbersome to me since I have to measure and otherwise figure out how to get it square like you mentioned. Something like this would make it useful for more than just once in a while. Right now, it sits on a shelf except for the times I want to attach and use it for a special case.
Mike Goetzke Replied:I was putting the finishing touches on the aquarium canopy and since I was out in the shop I spent a little time trying to get the rip fence better aligned to the rail. I found two things:
1) the get consistent results I do need to use a small quick-clamp to hold the black UHMW to my squaring fence.
2) no matter what I did (hammer the UHMW block or try to force it with my Bessey clamps) I couldn't get rid of my 1/16" difference front to rear - this is probable a good thing. Then I thought "Why not use the SRK to trim the rip fence?" It worked perfect. I made about 5 test cuts and I'm less than 0.008" off from front to rear on a 48"cut.
One of the things I'm really starting to appreciate about the PBB and accessories the more I use them is the precision you can achieve if you spend some time on set-up.
Mike
Bruce Benjamin Posted:Could you explain #2 a little? What was causing the 1/16" difference? Exactly how did you use the SRK to true the fence? It seems to me that you could just move the rip fence to make it square instead of trimming it. Obviously if you could've done this you would've done this so that's why I'm asking the how, what, and why. It's not clear to me what you're talking about.

Pics? Thanks.
Bruce
Mike Goetzke Replied:
Let me see if I can clear it up. The normal way to use the rip fence is to use a connector to clamp it to a SME at the front and rear of the PBB. If you want to rip say a 2" piece you have to set the fence at the front and rear at 2" from the blade independently. I wanted to speed up the process and add accuracy. The UHMW piece I attached makes the rip fence an "L" shaped square.

I designed my PBB to have a stop fence - instead of using stop blocks (this is a shot of my front SME - I used 5/16" bolts/nuts to hold the squaring fence to the SME):

But when I clamp the big piece of UHMW to my stop fence (fence at the front of my PBB) the UHMW material on the face of the rip fence was not 100% parallel to my saw rail. So using the SRK on the rail with a straight bit in my router I took a small trim cut on the face of the rip fence with my "L" shaped rip fence securely clamped to my squaring fence:

I found using the quick clamp at the front and a smart-clamp work the fastest and give the best results.
Mike
Peter Quadarella Replied:Mike, couldn't one use the connectors as normal, only squaring the fence with your block first, before turning the knobs/clamping down?
Although, maybe your method is quicker. However, if you put another connector through your square, perhaps you could use those two and not have to clamp the far side at all. Hmmm
Bruce Benjamin Replied:Thanks for the clarification, Mike. Your description combined with the good photos cleared it up. So, where do you suppose the error came from? Was the UHMW on the face of the fence
at fault or did the problem come from the added, "L" UHMW? I guess it doesn't matter now that the face is square to the bridge.
Bruce
Mike Goetzke Replied:"...couldn't one use the connectors as normal, only squaring the fence with your block first, before turning the knobs/clamping down?" This is how I had it set-up at first but I found that my added block wasn't exactly the same height (on the bottom) as the SME/rip fence. This cause the rip fence assembly to rock/twist and go out of alignment when I tightened the connector. But, your post makes me think maybe I can cut a hole in the UHMW block I added and use a connector there, although, is it just me or are the connectors sometimes hard to fine their way into the SME or is it just me? Especially when there are two of them fighting each other 4' away.
I tried the smart clamp at the far end because I didn't have a hole drilled in the rip fence yet at my PBB third SME position. I think I will drill a hole and add a connector at this table location. When I had the connector at the far end 4' away I found my arms weren't long enough to tighten it so I was constantly walking around the table to clamp it down.
By mistake I also found I got accurate cuts w/o the clamp at the far end. The SME extrusion is surprisingly stiff. But, in practice I'll use the second clamp.
"...where do you suppose the error came from? Was the UHMW on the face of the fence
at fault or did the problem come from the added, "L" UHMW? I guess it
doesn't matter now that the face is square to the bridge."I don't really know where the error came from (my block, my rail alignment, rip fence UHMW, rip fence SME...) I was actually surprised it was so close to start. One small thing I need to take care of is saw dust left against my squaring fence and rip fence black block. The residual static in this material really acts as a dust magnet (open for suggestions on how to remove the static). I'm sure the size of a trapped dust particle could magnify by 4x out at the end of the rip fence.Thanks for the comments/questions - it really helps me re-think what I have done and how I can improve it.
Mike
Dino Makropoulos Posted:Mike,
To re-think and go against your ideas is...eurekazone.
Good job.
Ez is happy because of you.

Thanks.
Ed Brady Posted:I expect to get my PBB order from Dino, soon. Meantime I am trying to picture and understand all this without having played with the parts. It seems to me that if you accurately align (zero) the measuring scales on both sides of the PBB then the fence should be square if you set both ends to the same number. Have I missed something?
Thanks
EDB
Mike Goetzke Replied:"It seems to me that if you accurately align (zero) the measuring scales on both sides of the PBB then the fence should be square if you set both ends to the same number. Have I missed something?"
If you mean at the front/rear as both sides you are correct. The small problem is that if you lock the front down at say 2" then you walk to the back to set 2" sometimes you find the front is off slightly and you need to tweak it a bit (this is the same with all clamp on devices).
What I tried to do was make the process quick/simple. I just slide the black block attached to my rip fence against my squaring fence to the 2" mark - lock it down and I'm done. I can do all of this from the front/working side of my PBB.
This works for me since, so far, I don't move my saw guide rail on my PBB and can have a fixed squaring fence. I suggest you play around with the system first to see what works best for you.
Mike
Dino Makropoulos Replied:Setting up the PBB. Older videos.
I like Mike's idea.
For precision parts I use this method.
First step. Calibrate the fence to the rail.
https://www.youtube.com/watch?v=jzSPLRtbq00https://www.youtube.com/watch?v=_bYhb9bkKVsEd Brady Replied:Thanks Mike and Dino. I understand what you have done and I'll wait 'til I get my setup and see what enhancements I want to make.
EDB
Peter West Replied:"F
or precision parts I use this method."A very quick and easy way of setting the fence, but it is limited to the length of the SRK traveller.
I was looking at creating a self squaring fence for the PBB which will work for any length and have a few solutions in mind which I have yet to find the time to experiment with.
One solution is to use the slots in the side of the PBB as shown here.

Fixing the fence rail (shown here in grey) to a support piece at 90 degrees to it (shown in black) which in turn is clamped to the side of the SME should result in the fence always returning to the same angle when the two knobs are tightened. The front face of the fence can be trimmed parallel to the rail by trimming it with a saw on the back side of the rail once it is placed.
Just another thought
 Randal Stevenson Replied:
The UHMW part of the fence is screwed in place. Peter, your making me think that another piece on the other side, also screwed into place and screwed into a piece of UHMW (like a stop in your picture), could constantly make the fence 90 degrees to the SME (dialed in to parallel with the guide with a trim).
Although you do lose the ability to use it for angled work then (without disassembly).
Peter West Replied:
There other solutions to that. Some simple, some more complex. When I have some more solid ideas I'll post back.
Peter Quadarella Replied:
Peter I like your idea, and there is no reason is shouldn't work. You could even makea new fence that is wider for more stability and accuracy. It could be made fully out of UHMW if there is not too much flex in it, or you could just back it with aluminim if there is.
The clamps could even be cam clamps for speed and ease of use if you want to spend more.
Dustin Bartlett Replied:A back to back rail, mounted on the face of the power bench, just below the bench surface mounted SME and above the face mounted SME (that holds the bridge) could work well as the track for connecting a self squaring fence. Would allow you to use a connector extrusion to provide a very solid and wide clamping surface for whatever UHMW widget you built to hold the fence square. Although a vertical SME on the face mounted as high as possible would work just as well I guess. Maybe even better as it would have more surface area for the UHMW to be clamped down to.
Mike Goetzke Replied:Dustin you make some good points.
I'll just review my set-up. I started with a 2'x4' base table (sort of a torsion box design):

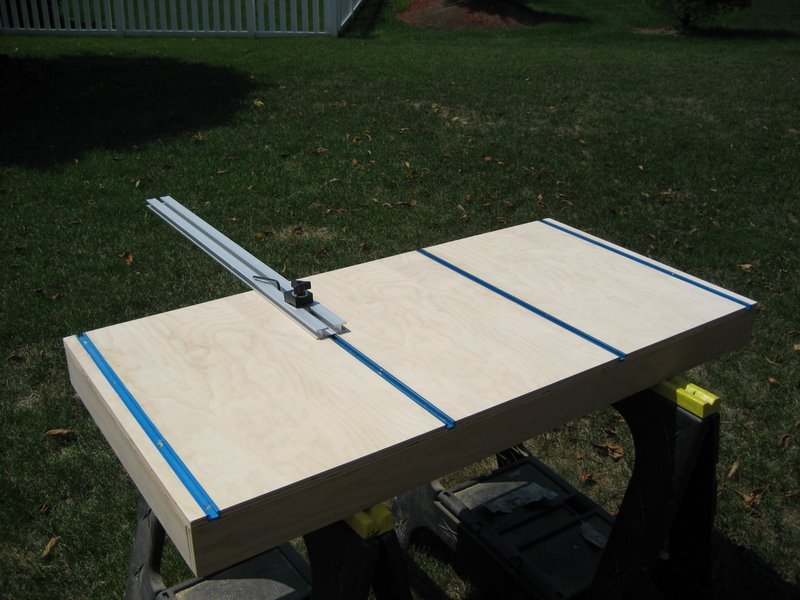
I made sure one end (the front) of the top was nice and flat. I call this ground zero. I attached an SME to the front/rear faces of the box to support the bridge. My top-front SME is 4' and the other three are 3'. You might notice I mount my SME's through a T-track. I use a straight edge (or squaring stops) to align the top-front SME to the front face of the base.After using the PBB I decided to have my cut line down the middle of the top, the SME's overhung 6" over the left of the base, rear three SME's overhang the right of the basee by 6", and the front overhangs the base by 18". This just works best for me right now:
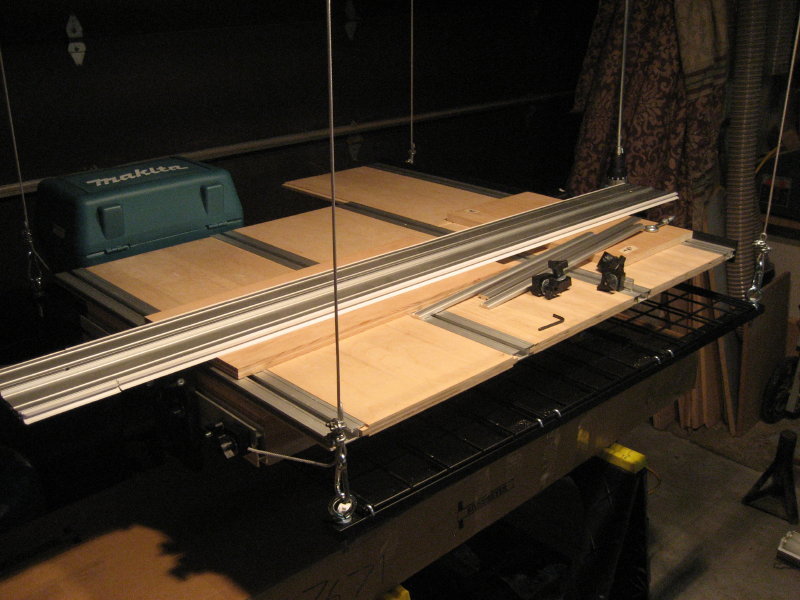
After using the PBB I got tired of moving the little squaring stops around and didn't like not being able to have the stops under the bridge. So I purchased a 3/8"x3"x48" piece of UHMW from Eurekazone and made a stop fence that runs the entire face of my top-front SME. I had the notch it under the bridge and where the saw travels. This UHMW squaring fence is mounted 3/4" above the table top so it also hangs below the table top. This works out well since I can square the top-front SME to the base by pushing this fence against the base and tightening the SME to the t-track:

I know my design doesn't fit everyones application but so far it has worked well for breaking down 4x8 panels and crosscutting/ripping solid lumber.
Here's the finished aquarium canopy I made w/ my son only using the PBB:


