Colin Cotell Posted:Hi Peter
As one of them from old Blitey,m I might just have to see how many people I can show this too


Also a happy owner of the EZ system Glad to see that sort of thing does not happen on an English forum( your other post in this forum)
Ps I hope this sort of thing does not happen much
Dino Makropoulos Posted:Peter.
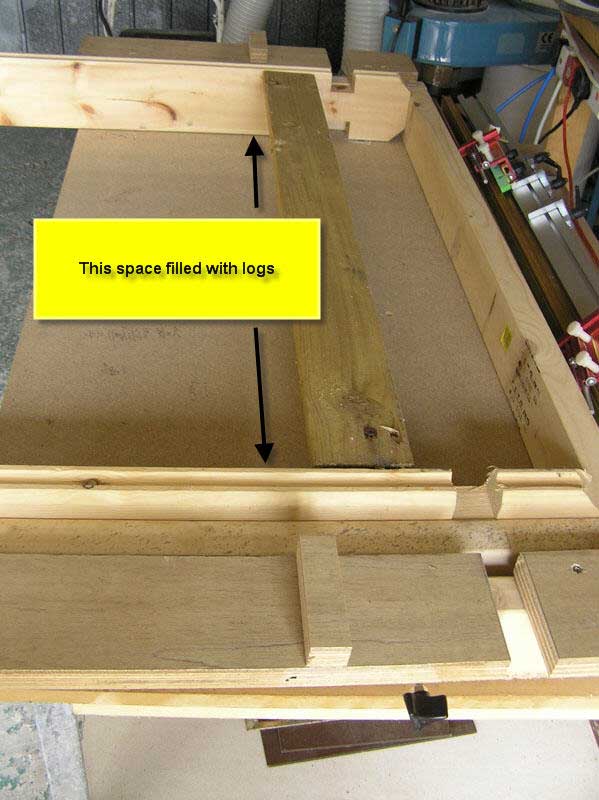
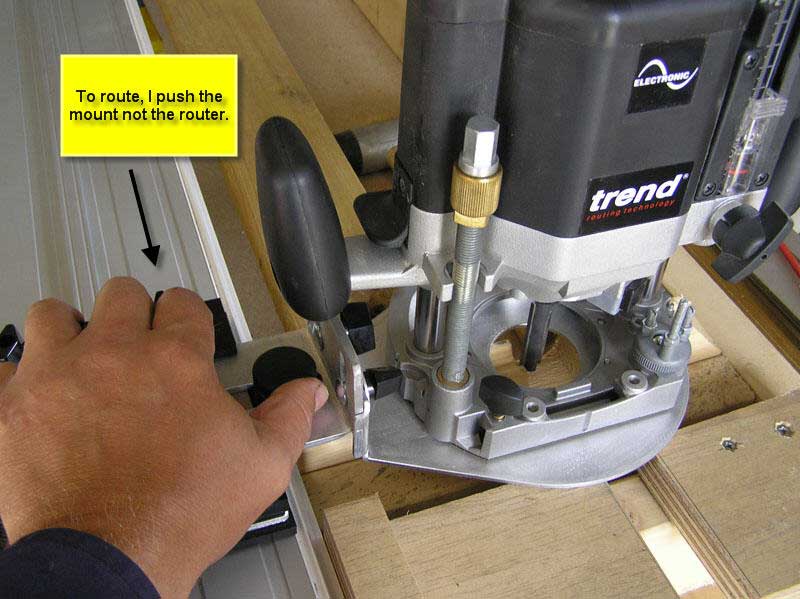
Your 3 dimensional thinking made the job easy.
The screw clamp , the rail positioning stop, the material support and your confidence to try
your way free of traditional tooling and thinking.
The same procedure (Dead Wood Concept) can be utilized for many applications.
Cabinets, moldings, flooring and just about anything that you need high volume and high production on limited space and without dangerous and expensive machinery.
PS.
I placed an order today for 200 pieces of 2"x 4" lumber
for ...something similar.
Thanks for the idea.

Colin.
This Forum is one of the main reasons that Peter and you found the tool.
Collective reason always prevails at SMC and we all win at the end.
To tell you the truth, I was very skeptical for few moments.

If I start posting at the UK forum
 Ron Blaise Posted:Nice Post Peter
Very interesting setup you have there. Enjoyed your photos too. (Don't pay attention to the grumpy ones). Hadn't had their coffee yet.
Bob Noles Posted:Absolutely brilliant work and making the best out of a great new tool for your needs, Peter. I can certainly understand your excitement in finding the right tool for the job.
Don't mind a few of the sceptical attitudes as I had the same problem about a year ago with my innocent enthusiam as well. If we will just let the "official" moderators do what they do best, SMC works better than any well oiled machine ever made.
Welcome and I personally look forward to the continuation of sharing ideas that benefit all of us no matter what your tool of choice is.
Peter Pedisich Posted:Excellent, thanks for sharing.
Peter,
Great photos! I like your methods, it's nice to see a different approach to our way of doing things in the US. This has been an educational post for me.
The deep SW of GB, is that Pirate country?!
Peter
Peter West Replied:
Not any more - but there are a lot of 'Cowboy' builders
Glad you appreciated the info.
John Eckels Posted:What are the dimensions of those boards? It looks like a 2x VG T&G, but I've never seen a T&G with a tongue that size before? There's nothing like that in any yard around here, that's for sure. You didn't run that pattern yourself did you?
Colin Cotell Replied:Hi Dino
To tell you the truth, it was Shady that showed us the tool but what help be see that it was for was all the bits on your part of this forum.
I can tell you that I think you would be welcome on the UK forum that we are on as some other manufacturer's post answers about they products but as on here there is on advertising ( unless payed for )
The bit I found a little strange about this ( I am a tradesman of over 22 years as you know and have always welcomed new ideas ), but the first thing some look at was it must be advertising and treated it so, then to find out they were wrong, I think asking the question first before jumping in with both feet, is what I would expect
. If this forum is open, than all ideas should get to see the light of day.
If you search the forum I am on the big subject is dado blades but that is for another day.
Now to chage the subject, I will try to post some more of me work and hope to get it in the right place
Peter West Replied:
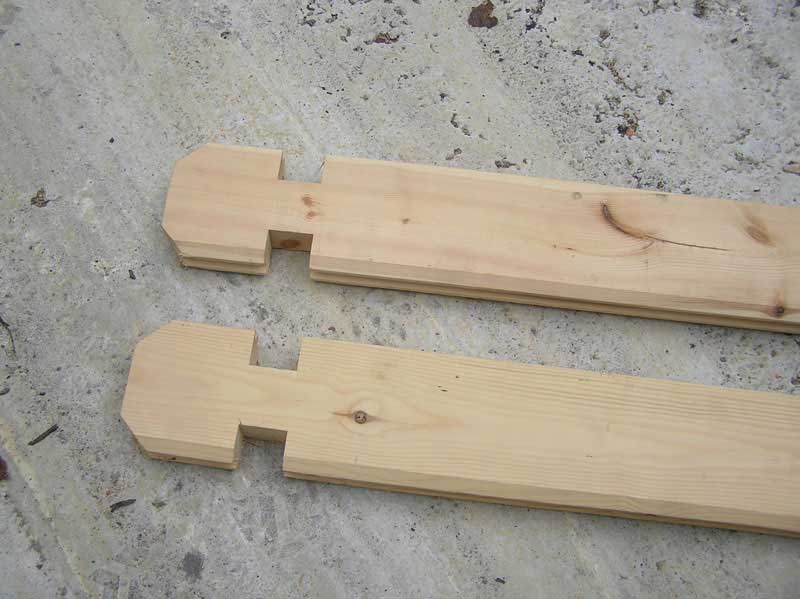
The Boards are 40mm x 125mm (US equivalent would be 1.5" x 4.75").
Here is a picture of the actual profile.
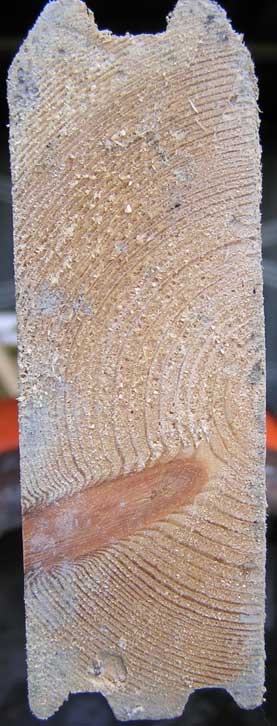
As you can see it is a contoured profile which creates a double interlock (similar to T&G) which is shallow for ease of assembly, the double lock for weatherproofing. That is why the groove looks so wide.
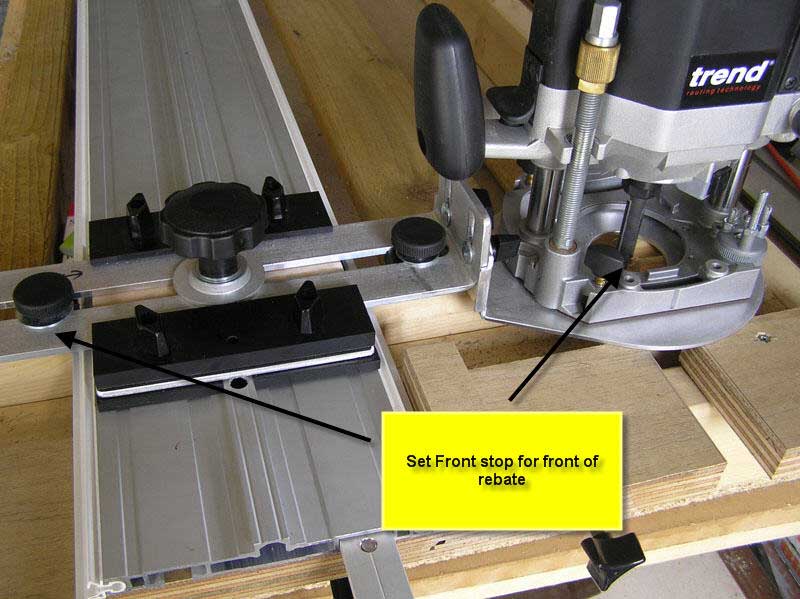
I was going to do something similar by just using two slot cutters spaced on an arbour to create a wide double standard T&G with chamfer on the outer edges, which would have meant more passes of the router.
This would not have been a problem using the guide rail system, however I was fortunate because I have business contacts in the Czech Republic where there are manufacturers who make buildings using this type of technique, and one of my contacts managed to get a manufacturer to lend me a router cutter with the profile that they use. Normally they use spindle moulders for production, but they have some specially made router cutters that they use on site for repair work. Using their cutters I was able to cut the profiles in 2 passes for each side instead of maybe six using the T&G method.
I have had a number UK contacts who have shown interest in doing their own buildings and I have sent a sample to a cutter manufacturer who is now going to look at the possibilities of making them here in the UK as they are not a standard profile.
What is even more interesting is that some of my software customers have asked me to put together a complete instructional booklet explaining how I did the job, complete with plans and details of the tooling needed so that they can sell custom made outbuildings (summer
houses, workshops, home offices, etc.) to their customers, and have their contractors make them on site. I am now considering doing this if the demand grows any higher. My neighbour has already asked me to lend him the tooling and help him build a summer house.
When I first started this project it was a means to an end - to replace my old garage with a new one in the cheapest possible way. Never in my dreams did I think it would end up creating such controversy and interest.
Bryan Cowing Posted:Excellent. Can you share dimensions on the tongue & groove, etc, and how you made that. Anything used to seal the tongue and groove during assembly ?
Peter West Replied:
As I mentioned in the previous reply, I borrowed a tool from a european contact - that's how I did the T&G. However it can be done using a standard T&G set such as these
http://www.wealdentool.com/acatalog/...g_Set_260.htmlYou can make the width of the tongue and the groove whatever suits the timber, and use a bevel edge on the outside to enhance the appearance - such as these
http://www.wealdentool.com/acatalog/...V_Set_261.htmlThese cutters are made up of individual groovers/slotters on an arbour and you can get them in varying widths to make up any size groove or tongue you like. Before I got the special cutter, I was going to use an 11mm tongue on each outside edge and 6mm slots and a 6mm tongue in the middle, all about 6 -8mm deep, then put a bevel on all of the outside edges
Just remember that unlike jointing on boards, the tongues should be slightly sloppy in the grooves to allow the boards to be assembled easily.
As far as sealing them, they should be assembled in a natural state, natural humidity makes them 'swell' so they form a good seal.
Michael Conner Posted:Peter,
That is one cool system. I know you aren't taking credit for it, but it is neat nevertheless (or everthemore). I have a question, how is it achored? Do you have a base plate bolted to the concrete with the bottom 'log' nailed to the base plate?
Thanks in advance.
Mike
Peter West Replied:
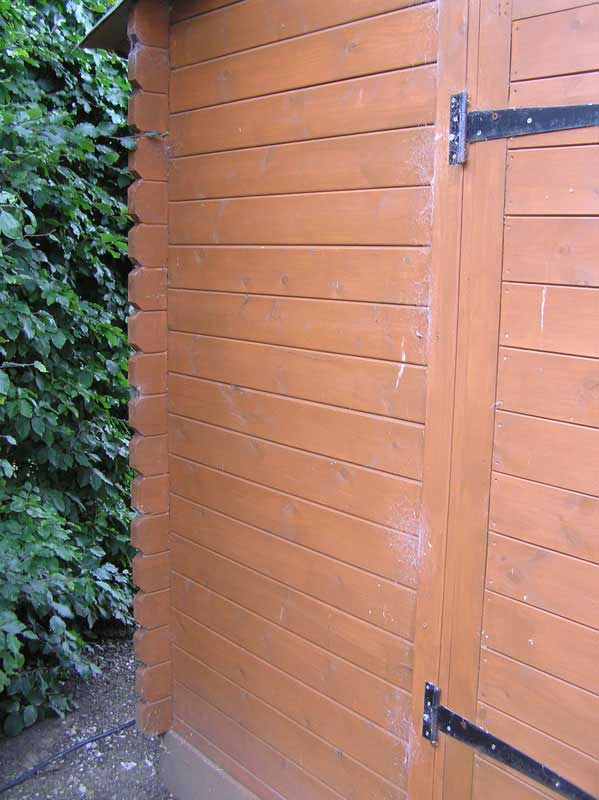
"how is it achored"The way the logs interlock means it does not need bolting down - the building weight holds it in place.
it can be erected straight onto concrete or a dwarf wall block base, but I have mine placed on 2"x2" heavily treated bearer battons on damproof tape on a single row of bricks.
I had a re-think about the building and have extended it to incorporate a workshop and garage and have ended up with this - 32 feet x 18 feet.
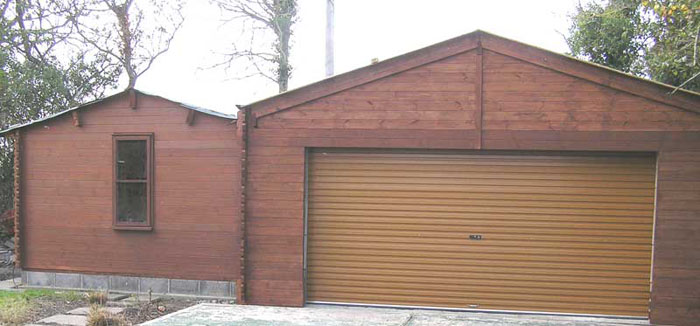
It took less than a week of man-hours from start (ie digging out the base) to completion as shown (apart from the inside laying out and electrics etc) for one man (- me
). The material for the building cost me less than $3800 (including the new door on the front) and the concrete base blockwork was $750.
I am well pleased with the results.
Don Baer Posted:Very nice, good job, now how about a tour of the inside..
Peter West Replied:I am in the process of laying it all out - lots of new benches and cabinets to make.
I am now busy planning a trip to Scotland next week and New York in November so will post a tour when its done in a few weeks.
Jim Becker Posted:Truly a great example of putting "production methods" to work! Nice job.
Art Mulder Posted:"The way the logs interlock means it does not need bolting down - the building weight holds it in place."Hey Peter,
Thanks for this posting... I missed this thread when it first debuted, and I'm glad to see it now. This is a very cool method of quickly erecting a shell.
But as for bolting it down... Any place with threat of high winds or tornados is definitely going to need fastening. Years ago I knew of Greenhouse here in Southern Ontario (NOT a tornado area) knocked off their foundations because the suction of the wind just lifted them by the roof.
But what about insulation? I realize that your climate is milder than mine here in Canada, but do you insulate the building at all? 1.5" of wood doesn't seem like much. I've never understood that about log buildings. We're always told by the building industry and the energy efficiency industry that wood is the "thermal bridge" in conventional construction. Thermal bridges are bad, since it conducts heat out. Yet log homes like this are 100% wood!?
best,
...art
Peter West Replied:We don't have Tornados here in the UK - but where I llive does suffer extremely high winds, and trees have been known to be demolished.
The idea of building this way is that the 'logs' are not fixed to each other so can expand and contract with atmospheric conditions without any fixing pressure inducing warping or cracks.
One way to fix the walls down is to bolt the first row to a solid footing, and to then place a timber upright in all four corners. This upright is bolted to the bottom log with a fixed bolt, and fixed to the top by cutting a 'slot' in the upright and 'loosely' bolt to the top
log.
As far as insulation is concerned, thicker timber can be used (4 inches if or even more) and alternativley internal insuation can be fitted between battons fixed to the walls using the 'loose' bolt method, and then panels screwed to the uprights used to cover the insulation.
I'm not sure what temperatures you have to contend with, but my office has seen me through 3 winters where temperatures have fallen to below freezing - and I've had no problems.
Patrick Anderson Posted:Very nice work mate, I like the concept as well.
Louis Rucci Posted:This is brilliant.
Within the last hour I put in my order with Dino.
This past summer I had a 30' x 28' shop built in my back yard and this does not include any inside work, for more money that you paid for materials.
I'm totally interested in knowing if you ever developed the instuctions mentioned in an earlier post.
I can definitely see this as a viable business and would like more information on the construction method.
I live in Norteast Florida, so while tornados are rare, high winds from NorEasters and, of course, hurricanes are the main threat.
Florida building code is one of the best and strictest in the nation and I would have to see what modifications, if any, would be needed to sucessfully build here.
Thanks for any information you can provide.
Louis
Peter West Replied:
As a result of bad health during the first half of this year I have was not able to do much.
The procedure is quite EZ and I will do some instructions in due course, but at present I still have a backlog of work to catch up on, and am launching a new company in the UK shortly and have a lot to do preparing for that.
But they will be done


 . One of the penalties of living in the English Countryside
  .)
.)