This thread was originally posted on SMC by Peter West. It is here with his permission.Here is a design for a router tunnel for use on a 'Power Bridge' table.

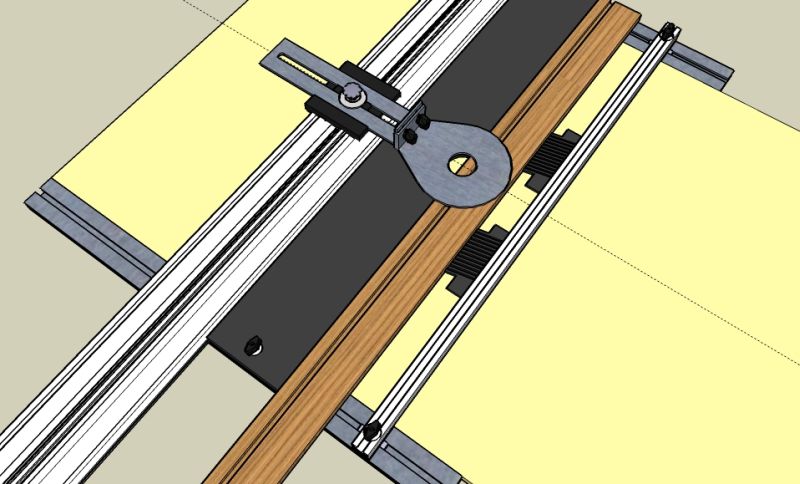
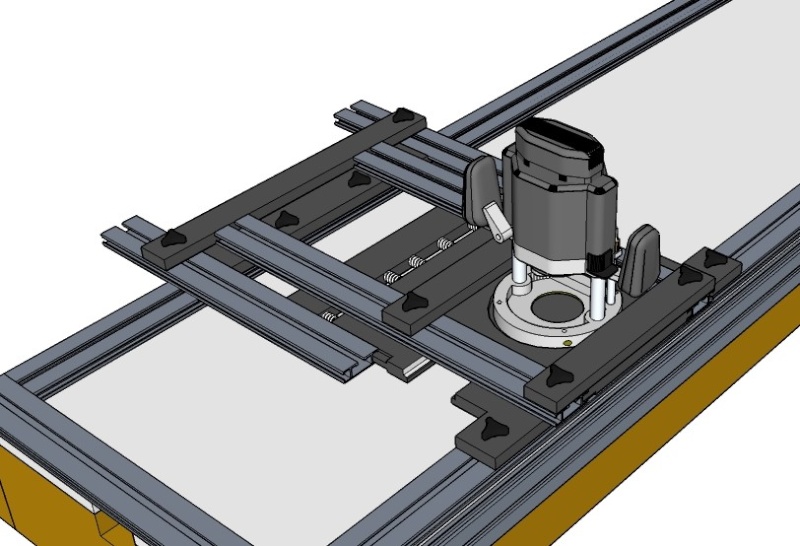
It simply consists of a back fence (any material) which clamps in front of the Guide Rail, and 2 'holdins' made from 6mm (1/4") UHMW which are attached to a length of Back to Back Extrusion which slides and locks in the SME's on the back and front of the table.
The template for the 'holdins' is
here.
They can be easily made using a 6mm (1/4") router and can be any size you want.
Obviously the SRK shown has no router or stops on it, but I think you'll get the idea.
EDIT: The dimension for the fence width should read 80mm (3") - not 8mm.
EDIT2:
Here's a version with a featherboard (homemade or shop bought) attached to B2B instead of the custom holdin.
The blocks under the B2B at the ends will obviously have to be the same thickness as the featherboards.
 Bruce Benjamin Posted:
That's a good diagram, Peter. I want to point out that one should feed the stock in the proper direction to keep the workpiece tight against the fence. On a router table you feed from right to left when facing the fence. In this case you would feed from left to right, or, from the bottom left corner of the diagram to the upper right corner. This way the spinning router bit will want to pull the workpiece tight against the fence instead of pushing it out against the semi-flexible, "Holdins".
Regarding the, "Holdins", while I like the design I don't see them really offering any sort of anti-kickback function. Maybe that wasn't your intent though. Over the years I have built some homemade feather boards and they've worked fine. A few years ago I was at Harbor Freight and saw these plastic feather boards:
http://www.harborfreight.com/cpi/cta...emnumber=36697 I got them on sale for a few bucks a each and bought 4 of them. I removed the useless angle gauge in the center by prying it out with a screwdriver, (note to self, sharp broken plastic will cut your finger!


). That way I can flip it over easily to use in either direction. They come with locking knobs and expanding pieces that fit into a standard 3/4" miter slot. Surprisingly, they hold quite well.
I've used these feather boards quite a bit on both my tablesaw and my router table for 2 or 3 years now and they've never missed a beat. I would think that they would work equally well on the router tunnel and they would also help prevent a kickback. I've seen very similar plastic feather boards sold elsewhere that are clearly of the same design but without the useless gauge in the center but they've always been more expensive. I think your, "Holdins" would work well for a tunnel but they don't really offer any anti-kickback function and you have to buy the material, (UHMW ain't cheap) and then make them. That's fine for some people but I thought I'd offer a cheap, lazy, and possibly safer alternative too.
Bruce
Peter West Replied:"I've used these feather boards quite a bit on both my tablesaw and my router table
"Nice one Bruce.
I do have to try and remember to think 'outside of the box' sometimes.

We have something similar over
here (but as usual they are slightly more expensive).
I will amend the drawing.
 Bruce Benjamin Replied:
Peter, I think your ideas and videos/drawings are some of the best things going on this forum right now. I just saw the, "Holdins" as a solution to a problem that's already got an easier solution. But I haven't ever actually tried the router tunnel so I don't know how the feather boards would work in practice. Springy slippery plastic is springy slippery plastic though.


Regardless of how the Harbor Freight feather boards would work on a router tunnel though, they do work quite well elsewhere in the shop. I sure didn't expect these cheap little pieces of junk to work so well or last so long but I guess they aren't junk after all.

When are you going to add to your, "Live action" type of videos? As good as your animated videos are, I prefer a live action video. Keep up the great work, Peter!
Bruce
Peter West Replied:
Thanks for the kind words Bruce - but I have to say that many of my 'ideas' are born of comments, ideas and thoughts of EZ users who post on this forum.
"When are you going to add to your, "Live action" type of videos?"


!!!.
It's just a question of time.
I have a lot going on at the moment and could do with a 'clone' or two (as someone else suggested earlier on this forum).
But I am committed to getting them done as soon as possible - although I am aware this doesn't answer your question
 Bryan Parlor Posted:
Peter,
Thanks for the reminder, I have some of the same feather boards leftover after I sold my table saw. I went out to the shop this afternoon and put short connectors on them. They are great for stops as well.
Bryan
Mark Vernon Posted:Peter
I'm picturing the B2B sitting pretty close to the surface of the table. So how do your "holdins" clamp to the underside of the B2B? And did you cut a groove in the little curved oak front edges to slip over the front edge of the UHMW holdins? Thanks.
Mark
Peter West Replied:"So how do your "holdins" clamp to the underside of the B2B?"
They are attached using countersunk screws through 2 new holes in the holdins into a short piece of connector in the track on the underside of the B2B.
The original holdins were used elsewhere and needed to be adjustable, hence the slots. But using them on the B2B there is no need for adjustment slots anymore as the B2B can be moved to give the required clamping pressure.
"did you cut a groove in the little curved oak front edges to slip over the front edge of the UHMW holdins?"
No, they are flat. They were there simply to offer more depth to the face, and also add a bit of strength. However I took them off at one stage, and find it works just as well without them.
Andy Richards Posted:maybe i'm clueless because i dont have one to play with, but where do the wood chips go with a setup like this?
Grant McCombie Replied:they go everywhere!!
just kiddiing I have tried both overhead and underneath with about the same results
I have a dewalt router with pretty good dust extraction from above
grant
Bruc e Benjamin Replied:I don't have a tunnel routing setup to play with so I'm just visualizing this in my head, bear with me...It seems that it wouldn't be too hard to make a dust extraction setup similar to what is commonly used on a router table fence. It may have to be a little smaller and more restrictive because with a typical router fence it's a few inches tall and that leaves plenty of room for a 2 1/2" dust fitting. With the router tunnel the vertical edges are all pretty short, (3/4" or so?) so it wouldn't be as easy to hook up a dust fitting. but I'm sure it could be done if you were to either cut some channels into one of the guide fence surfaces and/or add a port(s) of some kind to the bottom surface on which the workpiece slides. I'm sure it would be easier for me to visualize if I had one in front of me but this doesn't seem too hard.
The main router I use is the old Freud FT2000e and it comes with a plastic dust port that screws onto the base around the bit. It's good in theory and it's definitely better than nothing. But it's made from really cheap and flimsy plastic and I've had to glue it back together 2 or 3 times. It also doesn't get all of the dust and is better or worse depending on what sort of bit I'm using and on what part of the wood I'm routing. When it's mounted in my table I have a small hose hooked up to the Freud dust port and a 2 1/2" hose hooked up to the fence port. For the most part this gets the majority of the dust but if I'm routing dados the fence dust port gets almost none of it. I think some of the same problems I have with my router table setup would be encountered with a tunnel routing setup, with regards to dust collection that is.
Bruce
Dik Harrison Posted:A problem?
It looks like to me that at the beginning and end of the cut the wood would have the opportunity to move away from the fence since it would only be held to the fence at one point. The design I was working on has a spring loaded "rail" the runs the full length of the tunnel to prevent just that problem.

As usual, my original design is way too complex. I haven't had time to get back to it, but I think there is a real need for even pressure to the work piece throughout the length of the tunnel.
P.S.
Just saw Seumas' Router Tunnel Video, I like his method of holding the material against the fence.
Mark Vernon Posted:Some advice here?
I"ve been looking at this setup for a simple router tunnel Peter drew up, and am thinking this would be quick and easy to do on a piece of ply, then set it up on my workbench, or even a set of sawhorses when I need to rout smaller stuff. I don't own a pbb and don't yet want to
take that plunge, but with Dinos special, this might be a good time to set this up. I have the SRK and the 114" rail set, sliding square, and 2 smart clamps with upgrade. I'm thinking I'll need 2 SME pieces about 30", a 30" piece of btb to hold some form of holdins, a couple connectors to hook the holdins to and connectors for the fence (I'll build this), and the btb (4 total).
So what do you think about the 30" size for the SMEs and btb, and what do I need to connect one of my rails to the SMEs?
Hey, I just had another thought. Can I connect two smaller pieces of SME to make a larger piece without losing any function? Like still slide connectors or stops the whole distance across from 1 piece to the next without having to take out and enter from opposite end? Any opinions most appreciated.
Mark
Dino Makropoulos Posted:"Hey, I just had another thought. Can I connect two smaller pieces of SME to make a larger piece without losing any function?"
Mark,
Smart thought and you can save 50% with smaller SME's.
Same goes to guide rails and BTB's.
Mark Vernon Replied:Dino,
I was hoping you and some others might weigh in here. Thanks. Any opinions on the approx. size I suggested? Am I missing any pieces to make this functional? My intent was to make this a smaller, portable piece that I can put up on the bench, add the rail and SRK, then out of the way for other work. Probably also be functional for smaller cuts with CS and fence/square, easy to put together and relatively inexpensive to start out with.
BTW Dino, when do you sleep?

Mark
Peter West Replied:Vernon,
Thanks for your PM. I think I understand what you are looking for, and if that is an inexpensive 'portable' solution to the tunnel, you could try something like this which could hang on the wall when not needed, and be mounted on any bench top, PBB or Smart Table for use.

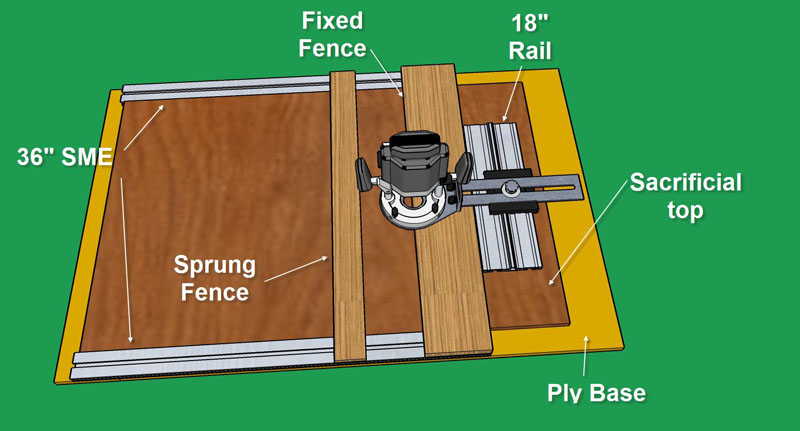
The one shown here (which is a quick drawing) is based on an 18" guide rail which is screwed in place on the top, 2 x 36" SME (back and front of the table), and the two fences which are made to the same width as the table (which can be any width you want) and clamped onto the SME using 2 short lengths of connector.
The lengths of SME and guide rail used can be anything you want, depending on how much space you have, the maximum width of material you want to pass between the fences and how much support you want in front and behind the router bit.
The type of sprung fence used can be simple hold ins on some B2B extrusion or plywood, or the Spring design posted by Seumas, or any other design of your preference.
For those who already have an SRK, this setup would be quite inexpensive to build as you only need 2 x 36" SME ($60 for a 72" cut in half), one 18" (or shorter) rail ($33) and a couple of short connectors with knobs ($10).
(These prices are for the parts on Dino's products page - but could be less if you can put the table together using shorter parts and 'specials'.
NOTE: You may not need the SME's to be as long as 36", as the tunnel is most suited to route long narrow pieces. For wider material, it is probably better to use the SRK running it on the guide rail in the convention way. But that is determined by personal preference and the job in hand.
Mark Vernon Replied:
Peter,
This was more than I expected and exactly what I needed. I hope to be able to return the favor some day. Thank you so much for your trouble.
Mark
