EurekaZone Focus Group
A new forum is now up.

http://tracksawforum.com/index.php
EurekaZone Focus Group
A new forum is now up.

http://tracksawforum.com/index.php
EurekaZone Focus Group
Would you like to react to this message? Create an account in a few clicks or log in to continue.
EurekaZone Focus Group

EurekaZone now has a new forum, please support it. http://tracksawforum.com/index.php
 
HomeHome  Test PortalTest Portal  Latest imagesLatest images  RegisterRegister  Log in  
Announcement
EurekaZone is supporting a new forum, Track Saw Forum. Please visit and support it. The forum here will become inactive in the near future.
Search


Display results as :
 
Rechercher Advanced Search
Navigation
 Portal
 Index
 Memberlist
 Profile
 FAQ
 Search
Statistics
We have 223 registered users
The newest registered user is Gene

Our users have posted a total of 850 messages in 227 subjects
May 2024
MonTueWedThuFriSatSun
  12345
6789101112
13141516171819
20212223242526
2728293031  
CalendarCalendar


 triple bridge double router set up

Go down 
4 posters
AuthorMessage
matthew fiori

matthew fiori


Posts : 16
Join date : 2008-07-02
Location : Sedona, AZ

triple bridge double router set up Empty
PostSubject: triple bridge double router set up   triple bridge double router set up EmptyAugust 10th 2008, 12:47 am

ok Branko, here you go

originally i was thinking of only using the PBB as a router table and simply storing the PBB under my MFT and taking it out when needed.


when it arrived however, it soon became obvious how useful it can be and so i decided to build legs for it and connect it to the MFT in a L
shape (idea stolen from Dik Harrison posted pictures of his own work table for the shape).

right now I am working on building the legs which we will get into that a little later.

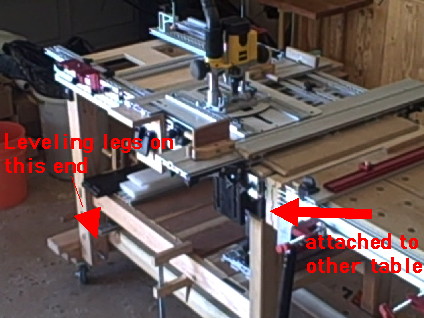
this is how I plan on connecting the two tables together

triple bridge double router set up Table_10

triple bridge double router set up Mftwc10

i made one piece to mate to this connector which is just about the width of the PBB but screwed it up a little so I need to make another one.

I plan to simply drill holes through the piece that extends below the table and bolt it together with 1/2" bolts and wing nuts .

the mating piece to this will be attached to the PBB in a similar way.

so i am going to join those two legs for the PBB (that are sitting on top of the mft) together with a locking mortise and tenon joint just for fun.

when i only had the wood rat, i would have to do that the rat way which required a bit extender and a 2 inch bit and adding the 'raising plates'
to get the depth etcetcetc to cut the tenon the necessary length.

here is what the tenon looks like held by the rat fence

triple bridge double router set up Tenon110

i made some other tenon cuts with the rat but never liked that set up for this sort of long tenon so i would rather cut these with the board flat on the table.
this was really one of the things that brought me to EZ, looking for a way to do that sort of operation.

so here is how that works.

i did a little of this yesterday and this board is wider than the 'up' or fully raised bridge position allows for
relative to where the bridge sits when this board is face down on the table,

so working on the face and working on the edge required resetting the bridge each time.
this was a little time consuming.

today i realized that that giant sub base for the saw is now a very stable piece of
guide rail and so it too could be used in a three bridge/rail set up which would eliminate the need for resetting the bridge.
(idea stolen from Dino and his many different multi router multi bridge set ups)

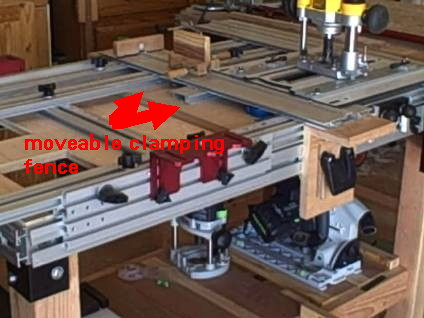
here is he set up for the edges

triple bridge double router set up Edge_r11

do you have this router and those guides that don't work very well on the f rails? well they work great with this set up.

i also got some 1/2" UHMW and made inserts that slide into the EZ rail edges to fill up the space between the router base and the
workpiece. they are not here in this picture because they were not necessary for this cut.

so that rail and bridge on the left in the picture above is now in the center of this entire set up and here is the set up for the face routing

triple bridge double router set up Face_r10

this, as you can see, is using the 'table from the rat' and again, that piece works much much better in this set up for this type of cut than it does on
the original piece of equipment.

all I need to do to switch from routing the edge to routing the face is to adjust the height of the bridge/rail in the center and reposition the workpiece.

so this all works. not as EZily as it would if i had another piece of EZ guide rail instead of that sub base for the saw, but it works for me for now.

here is a look at the three different bridges

triple bridge double router set up Threeb10

the third bridge that supports the f rail was actually designed to hold up a router fence. and while it is not actually being used as it was designed
it is in fact doing just that just upside down and sideways. i drilled and tapped a couple of holes in the wood under that rail to hold it to this bracket.

triple bridge double router set up Bridge10

here is one last one for today, when i got the rat, i built a rat wall to hold the rat and put it together so that the rat could be raised up to a height of about six feet.
when it is raised, that exposes a leigh dovetail jig that sits on a sliding table behind the rat in the lowered position.

triple bridge double router set up Ratwal10

now that i have the EZ PBB, i can actually cut boards perfectly with perfectly square edges to the exact dimensions that are needed you'll be amazed
when you see what you can do with it.

that's it for now.
Back to top Go down
http://matthewfiori.blogspot.com/
Dik Harrison

Dik Harrison


Posts : 233
Join date : 2008-07-01
Age : 76
Location : Evans, GA, USA

triple bridge double router set up Empty
PostSubject: Another great post...   triple bridge double router set up EmptyAugust 10th 2008, 3:30 am

Matthew,

It sure is interesting how so many things work better with EZ than with their original setup. You have a very inventive mind, you are a real EZ'er. Keep up the good work. I just wish I had more time right now to look more deeply into you ideas, I'm sure I'll eventually be able to employ them in my setups.

Thanks for sharing your ideas...

Dik
Back to top Go down
http://ezsmart.blogspot.com
Branko


Posts : 21
Join date : 2008-07-02
Location : Sweden

triple bridge double router set up Empty
PostSubject: Re: triple bridge double router set up   triple bridge double router set up EmptyAugust 13th 2008, 1:51 pm

Matthew,

thanks for sharing, great to see how you are using F-tools with the EZ-rails and stuff

cant wait to get my benches!

/branko
Back to top Go down
Greg Vaughn


Posts : 1
Join date : 2008-08-15

triple bridge double router set up Empty
PostSubject: Re: triple bridge double router set up   triple bridge double router set up EmptyAugust 15th 2008, 3:31 pm

GREAT ideas, Matt! Thanks for all the pictures. I've got a WR too and I'm still in the planning stages for my ultimate PBB. This gives me more to think about.
Back to top Go down
matthew fiori

matthew fiori


Posts : 16
Join date : 2008-07-02
Location : Sedona, AZ

triple bridge double router set up Empty
PostSubject: Re: triple bridge double router set up   triple bridge double router set up EmptySeptember 28th 2008, 8:09 pm

Ok. so it took me a while to finish the base for the PBB (mostly procrastination) but it is done now and coupled with the table that i already had in an L shape. The work surface is about 41.5 inches from the floor. I am 5'11" and find this to be comfortable for me. The other table is a Festool MFT which I had previously jacked up on 4x4 blocks but this higher height is a height that I like a lot. The whole thing is on casters and moves around very nicely in the space of a narrow one car garage. The two tables join pretty easily and separate pretty easily so that if i wind up needing a big table space, these two can become table ends in themselves. The current set up is such that it converts from a cross cutter to a router table by simply adding or removing the saw or the router. I used it so cut, square up and dado the pieces for a small box in Maple (dovetailed the box together with a Leigh jig) that came out very nicely.

Here are some different angles with the different tools.

This is a 2550 PBB. The Edison Bridge is on the end which attaches to the other table. (You can see it there sandwiched in between the red markup writing on the image) I have and additional level of SME running the edges of the 50" length. The table surface is split up into three sections by SME crossing on the 25" length and MDF serves as the second top. I cut into the MDF when cross cutting but I do not cut into the SME at all. The Bridge and Guide rail are lined up at the very end of the table purposely to avoid this. The MDF extends slightly beyond the end of the PBB to other table which serves to support the cut off. The stuff you see in the picture on the other table (directly above the red arrow on the right) is not there for any purposeful reason and would be moved when doing an actual cross cut or otherwise as necessary.

triple bridge double router set up 2550_r11

This is a view from the right. where you can see that sliding along in the SME there is a fence which can be locked down and has additional clamping capability. I use the rulers (pieces of metal tape measure available from EZ) which fit into the top of the SME for alignment. The router moves along the EZ guide rails held in place by the guide rail center ridges. I thought that I would need a cute way to keep that router sub base locked to the rails but this is not always necessary. If i want to lock it down, I just use a clamp. The router moves in the perpendicular direction on it's own sub base sub base. As you can see here, there is some convenient tool storage space right under the bench. I am very very happy with the precision that I can achieve in routing faces with this set up. Part of the base for the PBB is mortise and tenon and I was able to finish and fine tune the fit of those pieces very accurately with no mistakes. When I used this to cut dados for a box bottom, it worked simply perfectly (aka the EZ way).


triple bridge double router set up 2550_r12

Here is the bench in Cross Cut mode. Simply remove the Router and slide the saw in place. If you go to the earlier posts, you see how i turned this old style guide rail into a sub base for this saw. The whole base then locks onto the EZ rail so that it only moves along the rail in the cutting direction and not perpendicular so, it can not jump up or kick back. Full Bridge capability is of course preserved with this set up. That red anti chip aligner serves both of those purposes in addition to serving as one of the locking keys to the EZ rail. There is another one on the other side of the rail (actually the first iteration of this idea which got chewed up due to faulty design.

triple bridge double router set up 2550_c10

Ok, here is a final look from the right at the bench in cross cut mode. Here you get another look at the clamping fence (useable in both cross cutting and routing).

triple bridge double router set up 2550_c11

The second level of SME above the insert top (visible in the picture above just under the words Clamp Adjusters with the tape in it), allows for the use of stops on either end of the board in routing applications or for stops to be used for the repeat cut offs by inserting the work from the right. Those pieces are attached to the SME below them using connectors with threaded rod and star knobs. They slide along the 50" length and so can be used to extend the table lengthwise off the left end. The one thing that you will notice about this (the 2550) is that the table is a tool so if you were thinking that you might use it as a tool some of the time and a table some of the time, you might consider expanding that thought so that you have additional table space all of the time because as a tool it is going to prove to be very useful and you may find that you want it available all of the time in it's tool capacity. Effectively what that means is that as a table it's usefulness is significantly diminished.

If anyone has questions feel free to ask. I might take a few days or more to answer but I should be checking back in here every so often to see what kind of life is left in the dead wood concept.

One final note, in the event that you are new here, this is not an attempt to promote Festool stuff. In fact, I have had that stuff for a few years and was not able to do the sort of small scale precision work that I wanted to do with their products alone. Now that I have this set up, things are different. I can get the precision needed to make cuts that are square in all dimensions all the time. If you do any dovetail joining, you know how significant 'square' in all dimensions is. EZ makes that easy.
Back to top Go down
http://matthewfiori.blogspot.com/
Sponsored content


triple bridge double router set up Empty
PostSubject: Re: triple bridge double router set up   triple bridge double router set up Empty

Back to top Go down
 
triple bridge double router set up
Back to top 
Page 1 of 1
 Similar topics
-
» Blade Guard for my Bridge
» Peter West - Simple Router Tunnel

Permissions in this forum:You cannot reply to topics in this forum
EurekaZone Focus Group :: D.I.Y the EZ Way! :: How To-
Jump to: